Enabling Font Ligatures in Code Editors
Many operators and other symbols in programming languages consist of multiple characters, but still represent a single token. In C#, such symbols are ==, !=, >=, <=, =>, and many others. Although as programmers we learned to view these symbols as single logical units, there is a concept of ligatures in typography, which allow joining of multiple neighboring letters into a single glyph. With correct fonts and editor support these can be used to improve the rendering of source code on screen.


Many code editors already support font ligatures. If your favorite one is among them, there's nothing stopping you from enabling the feature and seeing the difference for yourself. No matter which editor you use, you will first need a font with support for programming ligatures. I like Fira Code best, but you can also choose from a few alternatives. The exact process of installing the downloaded fonts will depend on the operating system. In Windows, you need to right click the .ttf files and select Install from the context menu.
The exact process of selecting the font and enabling the ligatures differs between the editors. Below are short instructions for the three editors I use regularly.
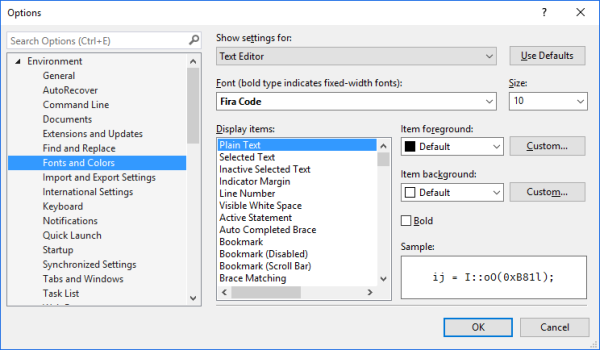
In Visual Studio 2015 you only need to select the new Font for Text Editor on the Environment > Fonts and Colors page of Options dialog, which can be opened via the Tools > Options menu item. You don't need to change any other settings, but you might need to restart Visual Studio to enable ligatures.
In Visual Studio Code you will need to change the settings.json file. To open it, select Preferences: Open User Settings from Command Palette or click the File > Preferences > User Settings menu item. Add the following lines to the file (of course, change the font name to your choice):
{
  "editor.fontFamily": "'Fira Code'",
  "editor.fontLigatures": true
}
The changes should be applied as soon as you save the file.
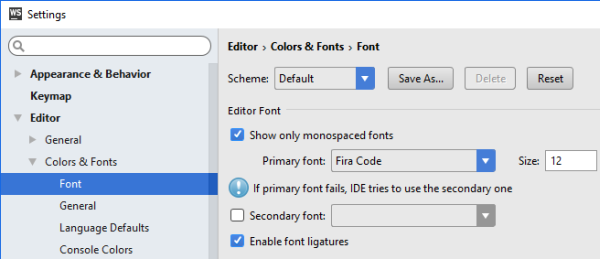
In WebStorm (or any other IntelliJ IDEA based editor from JetBrains) open the Settings dialog via the File > Settings... menu item and navigate to Editor > Colors & Fonts > Font page in the treeview. Here, select your font as the Primary Font and tick the Enable Font Ligatures checkbox. Note that font settings will be saved for your selected Scheme.
Programming ligatures take some getting used to and tend to be quite polarizing. I suggest you give them a try for a couple of days and then decide whether you like them or not. I've been programming with ligatures enabled for a few months and now it feels strange looking at code without ligatures. Your mileage may vary, however.
