Firebase Push Notifications in Ionic and Cordova
Ionic has no built-in support for Firebase Cloud Messaging (FCM), which is now also Google's official push notification infrastructure for Android. However, since Ionic is based on Cordova, it's still easy to make it work with one of the available Cordova plugins.
Setup Procedure
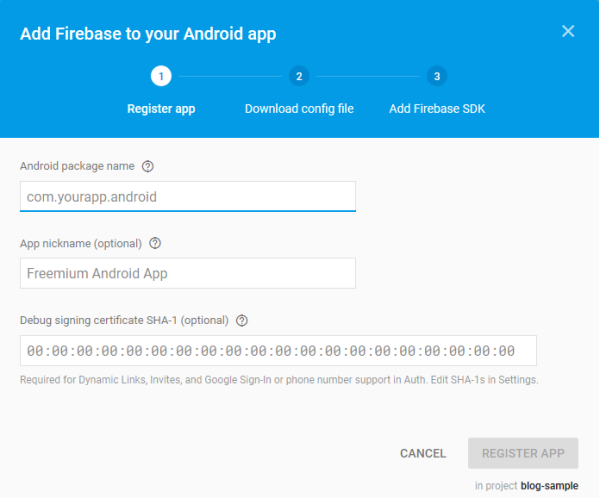
Of course, you first need to create a Firebase application if you don't have one yet. On the project Overview page, you can then click a link to Add Firebase to your Android app. In the dialog you will need to enter your Android package name, which you can find in config.xml file of your Ionic application. It's the id attribute value of the root widget element.
On the next page you can then download google-services.json file, which you need to put in the root folder of your Ionic project. With that, you are ready to install the Cordova Plugin for Google Firebase plugin (assuming you have already added the Android platform to your Ionic project):
cordova plugin add cordova-plugin-fcm --save
At the startup of your application (best in platform.ready() callback in app.component.ts), you will need to obtain a Firebase token and send it to your application backend. You will use it to send push notifications (messages) to the individual device. Here, I simply dump the token to the console:
declare var FirebasePlugin: any;

// ...

export class My App {
  constructor(platform: Platform, statusBar: StatusBar, splashScreen: SplashScreen) {
    platform.ready().then(() => {
      // ...

      FirebasePlugin.getToken(token => {
        // save this server-side and use it to push notifications to this device
        console.log(`Obtained token: ${token}`);
        FirebasePlugin.subscribe('all');
      }, error => {
        console.error(`Error: ${error}`);
      });
    }
  }
}
Since the token can change, you should also handle the token refresh callback:
FirebasePlugin.onTokenRefresh(token => {
  // save this server-side and use it to push notifications to this device
  console.log(`Refreshed token: ${token}`);
}, function(error) {
  console.error(`Error: ${error}`);
});
Responding to Notifications
You're now ready to handle incoming notifications:
FirebasePlugin.onNotificationOpen(notification => {
  // check notification contents and react accordingly
  console.log(JSON.stringify(notification));
}, function(error) {
  console.error(`Error: ${error}`);
});
The notification will contain all the details about the received notification:
- its
titleandbody, - custom key-value pairs you included in
datawhen sending the notification, - internal Firebase properties (e.g.
message_id), tapflag indicating whether the notification was tapped or received directly when the application was open, which allows you to react differently in these two scenarios.
Sending Notifications
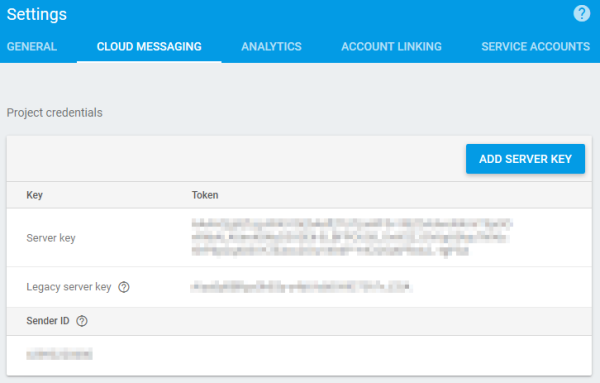
Notifications will typically be sent from your application backend using the FCM REST API. For testing purposes you can use any REST client instead, e.g. Postman. To authorize, you will need to use the FCM Server key, which you can find in Firebase console in Cloud Messaging Settings. Make sure you don't try to use the Wep API Key from General Settings instead, as I did at first.
Along with the Authorization header, your POST request must also include the Content_Type header, or you'll receive a non-descriptive Error=MissingRegistration response from the service:
Authorization:key=AAAACjg9ZUg:APA...QAPRxA2_-tgPSA
Content-Type:application/json
And this would be a typical request body:
{
  "notification":{
    "title":"Notification title",
    "body":"Notification body"
  },
  "data": {
    "key1": "value1",
    "key2": "value2"
  },
  "to" : "eq5hG2fvaQk:APA...uSTbCnbq35m",
  "priority": "high"
}
Individual values have the following meaning:
notificationcontains information for the platform standard notification,datacontains custom data for the application,tois the recipient of the message (individual token in this case, but could also be a topic that multiple devices are subscribed to),priorityspecifies, how the message will be delivered to the device.
You can check official documentation for details.
Alternative Plugins
I've only started implementing FCM and can't yet tell much about the reliability of the plugin I chose. At the moment, it seems the most feature complete of them all and also supports some other Firebase functionalities, not only Cloud Messaging.
I have checked two other alternatives:
- Google Firebase Cloud Messaging Cordova Push Plugin seems very similar, but is limited to FCM. I also couldn't get the token refresh callback to work, and you don't get the notification title and body in the callback.
- phonegap-plugin-push was originally written for Google Cloud Messaging (GCM), which is now replaced by FCM. Although version 2.x already supports FCM instead of GCM, I like the other two plugins more because their API maps more closely to the official Firebase client API.
