Dev container config for .NET Angular project
For simple projects with a single technology stack, you're likely to find a dev container template preconfigured with everything you need. That's what happened to me when I created my first dev container. For larger projects with more than one technology stack, more configuration will be needed.
To learn about it, I tried to set up a basic dev container for an ASP.NET Core with Angular project, created with the following command:
dotnet new angular
With the project folder open in VS Code, I started configuring my dev container with the Dev Containers: Add Dev Container Configuration Files... command from the command palette. I chose C# (.NET) version 7.0 as the template, and added Node.js (via nvm), yarn and pnpm and Angular CLI (via npm) as features.
Once they were added to the devcontainer.json configuration file, I decided to select a fixed Node.js version to use:
"ghcr.io/devcontainers/features/node:1": {
    "version": "18"
},
The available configuration options for features are often listed in their devcontainer-feature.json file. You can find them in their GitHub repository, linked to from the official features list.
To make the dev container's forwarded ports more intuitive, I first changed the randomly assigned default ones in project's launchSettings.json file to more standard 5000 and 5001:
"applicationUrl": "https://localhost:5001;http://localhost:5000",
Then, I added the ports to devcontainer.json and declared https as protocol for port 5001:
"forwardPorts": [5001, 5000],
"portsAttributes": {
    "5001": {
        "protocol": "https"
    }
},
At this point, I was ready to invoke the Dev Containers: Reopen in Container command. Once the project was ready in VS Code, I started it in the container from the terminal:
dotnet run
It failed to start with the following error because it was the first time I was running an ASP.NET Core project in this container:
Unhandled exception. System.InvalidOperationException: Unable to configure HTTPS endpoint. No server certificate was specified, and the default developer certificate could not be found or is out of date. To generate a developer certificate run 'dotnet dev-certs https'. To trust the certificate (Windows and macOS only) run 'dotnet dev-certs https --trust'. For more information on configuring HTTPS see https://go.microsoft.com/fwlink/?linkid=848054.
It can be fixed by following the instructions in the error message:
dotnet dev-certs https
If you don't want to have to run this every time you rebuild the container, you can add it as a postCreateCommand to the devcontainer.json file:
"postCreateCommand": "dotnet dev-certs https",
This isn't going ta take care of certificate trust in your host machine's browser, of course. To do that, you can follow the official instructions.
The app should now start, but once you open the page in the browser, the Angular build will start in the background. Make sure you don't overlook Angular's interactive prompts for its first run in the terminal, or it's going to wait forever. If it fails, it might be because you were building it natively before and the files in your node_modules folder are for the wrong platform. Deleting the folder and retrying should fix that.
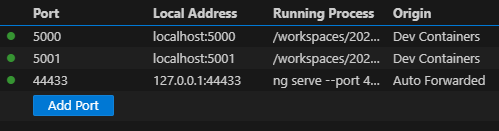
When it succeeds, your browser should automatically redirect to port 44433 (where Angular is running) and render the application. If you're wondering why it works, although you haven't forwarded the port in devcontainer.json, it's because it was listed in the terminal output and therefore auto-forwarded, as you can see in the Ports View:
You're now ready to start editing the files in VS Code. OmniSharp should work as expected. If it doesn't, check the OmniSharp Log in the Output window. In my case, it was listing some weird NuGet related errors which were caused by leftover files from my earlier local Windows build. To fix the issue, I stopped the project, deleted the bin and obj folder and then started the project again.
On the other hand, the Angular VS Code extension wasn't installed in the container by default. You can fix that by opening the Extensions pane and clicking the Install in Dev Container button next to the Angular Language Service extension. This will install the extension in the container, but not add it to devcontainer.json, so it won't be available to other developers using the same config (or you after you rebuild the container). To add the extension to devcontainer.json instead, right click it in the pane and choose Add to devcontainer.json from the menu. You can check the devcontainer.json file and see the extension listed there:
"customizations": {
    "vscode": {
        "extensions": [
            "Angular.ng-template"
        ]
    }
}
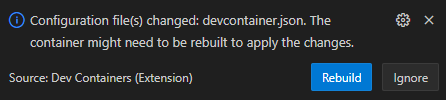
In response to this, you should get a VS Code notification inviting you to rebuild the container so that the extension gets installed:
If for some reason you don't (or if you have clicked Ignore), you can achieve the same with the Dev Containers: Rebuild and Reopen in Container command from the command palette.
When you start changing the Angular code, you'll quickly notice that the application doesn't rebuild and the page doesn't reload in the browser automatically as you're used to when developing locally. You can fix that as follows:
- To get watch working, you need to add the
--pollargument to theng servecommand inpackage.json:"start:default": "ng serve --port 44433 --poll 500 --ssl --ssl-cert \"$HOME/.aspnet/https/${npm_package_name}.pem\" --ssl-key \"$HOME/.aspnet/https/${npm_package_name}.key\"", - To get hot reload working, you need to add
49153to the list of forwarded ports indevContainer.json:"forwardPorts": [5001, 5000, 49153],
I found this enough for a basic development experience in VS Code. You can follow the same approach to add more features for any additional dependencies your project might have, or to add more VS Code extensions that you would like to use. With minimal changes to the configuration, you can open the container in GitHub Codespaces as well.
You can find the project with the dev container configuration in my GitHub repository. Feel free to use it as a starting point for your own project if it makes anything easier for you.
The available dev container templates are great to get you started with a simple project, but you'll soon want to customize them further with features and VS Code extensions. Fortunately, they are easy enough to add and configure once you know how.
