OAuth login in desktop apps
To authenticate to an OAuth identity provider from a desktop app, the authorization code flow should be used. To implement it, you will have to host a web view control in your application.
During initial research, I found two .NET libraries that can be used for that in certain scenarios:
- IdentityModel.OidcClient can be used to authenticate to identity providers implementing OpenID Connect.
- MSAL.NET can be used to authenticate to Microsoft Entra ID (formerly Azure Active Directory).
None of those were suitable for my scenario, so I had to implement the flow myself. In this post, I'll be using Xbox Live as the identity provider, as implemented by Xbox-WebAPI Python library and used by Playnite Xbox library integration.
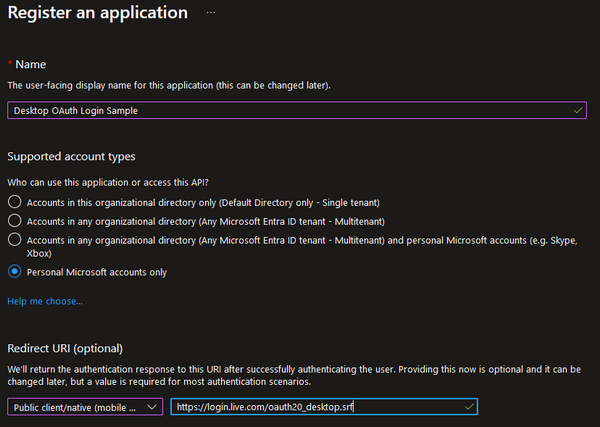
To authenticate to Xbox Live, you first need to create a new app registration in Microsoft Entra ID to get a client ID. You only need to provide a display name for the user, choose the account type (Personal Microsoft accounts only for Xbox Live) and a set the redirect URI:
- Choose Public client/native (mobile & desktop) for a desktop client.
- Use
https://login.live.com/oauth20_desktop.srfas the URI for Xbox Live.
The WPF web view control of choice today is the Microsoft Edge based WebView2. To set it up, you need to install its NuGet package and add it to your window:
<Window x:Class="DesktopOAuthLogin.LoginWindow"
        xmlns="http://schemas.microsoft.com/winfx/2006/xaml/presentation"
        xmlns:x="http://schemas.microsoft.com/winfx/2006/xaml"
        xmlns:d="http://schemas.microsoft.com/expression/blend/2008"
        xmlns:mc="http://schemas.openxmlformats.org/markup-compatibility/2006"
        xmlns:wv2="clr-namespace:Microsoft.Web.WebView2.Wpf;assembly=Microsoft.Web.WebView2.Wpf"
        mc:Ignorable="d"
        Title="LoginWindow" Height="520" Width="400">
    <Grid>
        <wv2:WebView2 Name="webView" x:FieldModifier="public" />
    </Grid>
</Window>
Before every use, you should delete all cookies, to make sure that the user isn't already logged in. You can access the CookieManager to do that, after the view is initialized:
loginWindow.webView.CoreWebView2InitializationCompleted += (sender, args) =>
{
    loginWindow.webView.CoreWebView2.CookieManager.DeleteAllCookies();
};
You can use the ContentLoading event to detect redirects and inspect whether the authorization code was already returned as a query parameter:
loginWindow.webView.ContentLoading += (sender, args) =>
{
    var url = new Url(loginWindow.webView.Source);
    authorizationCode = url.QueryParams.FirstOrDefault("code")?.ToString();
    if (url.ToString().StartsWith(redirectUri)
        && !string.IsNullOrEmpty(authorizationCode))
    {
        loginWindow.Close();
    }
};
With all that set up, you're ready to navigate to the login page:
loginWindow.webView.Source = loginUri
    .SetQueryParams(
        new
        {
            scope,
            client_id = clientId,
            redirect_uri = redirectUri,
            response_type = "code",
            approval_prompt = "auto",
        }
    )
    .ToUri();
The exact list of required query parameters and their values should be specified by the identity provider.
To make the login method more convenient to call, I used TaskCompletionSource. The returned Task can simply be awaited by the caller:
loginWindow.Closed += (sender, args) =>
{
    if (!string.IsNullOrEmpty(authorizationCode))
    {
        taskCompletionSource.SetResult(authorizationCode);
    }
    else
    {
        taskCompletionSource.SetCanceled();
    }
};

loginWindow.Show();

return taskCompletionSource.Task;
The calling code should catch (and most likely ignore) the TaskCanceledException which is thrown when the user closes the login window before completing the login.
Once the authorization code is returned, you need to exchange it for the access token:
var response = await tokenUri.PostUrlEncodedAsync(
    new
    {
        scope,
        client_id = clientId,
        redirect_uri = redirectUri,
        code = authorizationCode,
        grant_type = "authorization_code",
    }
);
return await response.GetJsonAsync<AccessTokenResponse>();
Again, the exact parameters and their values to include in the call should be specified by the identity provider. Just make sure that your call doesn't include the client secret because you can't securely store it in a desktop app. Xbox Live allows a call without the client secret in this scenario. Alternatively, your identity provider might require the authorization code flow with proof code for key exchange (PKCE).
At this point, you already have a working access token. However, you will also need to implement the code for refreshing the token if you don't want your user to log in every time the access token expires. The call is very similar to the one above for retrieving the access token for the first time.
Throughout the code, I'm using Flurl. This simplifies the code the most in the last call, which requires the parameters to be sent as a URL-encoded form post. But it also makes constructing and parsing of query parameters somewhat easier.
You can check the full source code for a working sample application in my GitHub repository. If you plan to use the code as a basis for your application, replace the client ID with your own, even if you're authenticating to Xbox Live. You want to properly identify your app to the user if you want them to trust it.
Although it's not overly complicated to implement the OAuth login, I recommend using an existing library whenever possible. In security related code, bugs and incorrect implementation can have especially dire consequences.
