Creating Themed Tiles for Windows Phone Applications
Design is an inherent part of developing Windows Phone applications. Even more than two years after it was first published, I still find Jeff Wilcox's design guide for developers the best introductory reading on this subject. It's also worth to take a closer look at his very popular Foursquare client for Windows Phone, 4th & Mayor, to see his recommendations implemented in an application.
Still, the guidelines are only the first step on your way to a well designed Windows Phone application. Sooner or later you'll need to add some Metro icons to it to represent different actions and items in lists. There are a couple of standard ones included in the Windows Phone SDK (take a look in the Icons folder inside each SDK version if you didn't know about that before), but you'll need more in almost any application. Even though Metro icons are small and monochrome, they're not all that easy to draw for a typical developer with little design experience.
Fortunately, there are many Metro icon libraries available online with mostly very permissive licenses, such as The XAML Project, The Noun Project, Modern UI Icons and IcoMoon, to name just a few. Though, the one source of icons that I'd like to point out in particular, is not a web site, but an application instead. Metro Studio by Syncfusion includes a library over 2500 icons and is a very useful tool for processing these icons at the same time. If you haven't done so already, I strongly suggest you give it a try.

Let's take a look at how to create a simple themed tile as the one above with the help of this application. First we'll create the icon. You can search the icons by their names and tags. If you still can't find what you're looking for, there's even an option to request a missing icon, although I haven't tried it out and can't say how accommodating their support actually is in such cases.

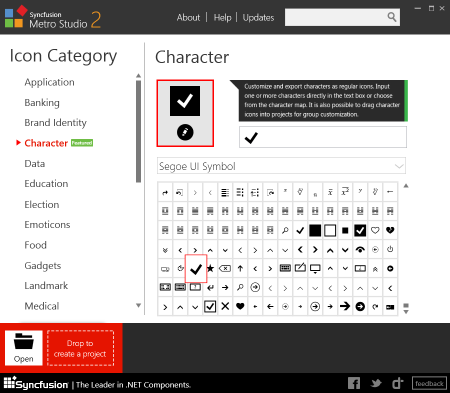
Before you do that, you really should take a look at the special icon category Character. It allows you to create icons out of font characters. If you take some time to browse through the Webdings, Wingdings and Segoe UI Symbol fonts, you just might find something fitting for your needs.
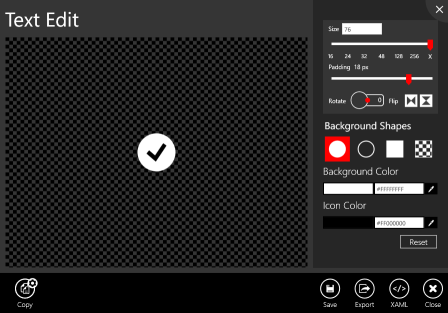
No matter where you find your icon, the next step is to edit it to suite your needs and here is where Metro Studio really shines. You can set the icon size and padding, foreground and background color, background shapes, etc. Once you're done you can export it in XAML vector format or one of many raster image formats available. You can even create a project and save the edited icon to it in case you want to edit it again later. Too bad this functionality is not available for icons from other sources, although I can understand the reasoning behind it. Anyway, for our sample we need the settings as seen in the image below and we need to save the image in PNG format.
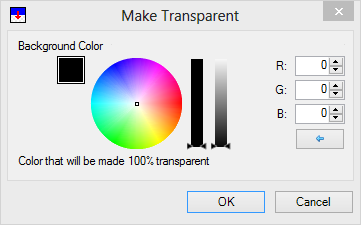
There's still some post processing required for the icon to suite our needs. The checkmark needs to be transparent instead of black so that the theme-colored background will shine through. This can easily be done using Paint.NET, as long as you have the Make Transparent plugin installed. Just load the file in Paint.NET, open the new effect dialog and use the settings from the image below. You'll see the results live, even before you close the dialog. Save the modified image as PNG again and you're ready to move to Visual Studio.
To make the tile background themed, the image needs to be laid over a grid with a proper background. This way the color will automatically change according to the user's selected theme accent color. We will leave the icon foreground color unchanged in both light and dark phone theme. It will work just fine because of that background.
<Grid Width="60" Height="60"
      VerticalAlignment="Top"
      Background="{StaticResource PhoneAccentBrush}">
  <Image Source="{Binding LogType,
      Converter={StaticResource EnumToImageConverter}}" />
</Grid>
You might have noticed the converter I used in the image source binding. It's a convention based converter to convert any enum value to the corresponding image in my project based on its name and folder.
public class EnumToImageConverter : IValueConverter
{
    public string SubFolder { get; set; }

    public object Convert(object value, Type targetType,
        object parameter, CultureInfo culture)
    {
        if (value is Enum && targetType == typeof(ImageSource))
        {
            var enumType = value.GetType();
            var format = String.IsNullOrEmpty(SubFolder) ?
                "/Assets/{0}/{2}.png" : "/Assets/{0}/{1}/{2}.png";
            var path = String.Format(format, enumType.Name,
                SubFolder, Enum.GetName(enumType, value));
            var uri = new Uri(path, UriKind.Relative);
            return new BitmapImage(uri);
        }

        return value;
    }

    public object ConvertBack(object value, Type targetType,
        object parameter, CultureInfo culture)
    {
        throw new NotImplementedException();
    }
}
This was just a simple example on how to use free icons and tools available to make a themed tile for your Windows Phone application. There's no need to stop there. With some resourcefulness you can make great looking applications even if you're no designer at all.
