Scroll-dependent Animation in Ionic
In my previous blogpost, I implemented a staggered animation in Ionic Angular where the animation-delay depended only on the position of the item in the list. This time, the delay will depend on the current scroll position of the list. The animation will start in the middle of the screen and move towards the top and bottom edges.
Since this will require inspecting the scroll position and calculating how each item in the list is affected, I will only do the calculation once, immediately before triggering the animation instead of continuously whenever the scroll position changes. In my case, this will be just before navigating to a different page:
public pushDetail() {
  this.initializeAnimation().then(() => {
    this.navController.navigateForward('/detail');
  });
}
To implement the animation, I will need the following data for each item in the list:
interface ItemAnimationData {
  visible: boolean;
  position: 'above' | 'below'; // relative to the middle of the screen
  offset: number;
}
Although the calculations are not particularly complicated, they still require a non-trivial amount of code:
@ViewChild(IonContent)
private ionContent: IonContent;

@ViewChild(IonList, { read: ElementRef })
private ionList: ElementRef;

@ViewChildren(IonItem, { read: ElementRef })
private ionItems: QueryList<ElementRef>;

private initializeAnimation() {
  return this.ionContent.getScrollElement().then(scrollElement => {
    const minYVisible = scrollElement.scrollTop;
    const maxYVisible = scrollElement.scrollTop + scrollElement.offsetHeight;
    const midYVisible = (maxYVisible + minYVisible) / 2;
    const listTop = this.ionList.nativeElement.offsetTop;

    let firstIndexBelow;
    const itemPositions: Pick<ItemAnimationData, 'visible' | 'position'>[] =
      this.ionItems.map((item, index) => {
        const elementTop = listTop + item.nativeElement.offsetTop;
        const elementBottom = listTop + item.nativeElement.offsetTop +
          item.nativeElement.offsetHeight / 2;
        const elementMiddle = (elementTop + elementBottom) / 2;
        const visible = elementBottom > minYVisible && elementTop < maxYVisible;
        const position = elementMiddle < midYVisible ? 'above' : 'below';
        if (position === 'below' && firstIndexBelow === undefined) {
          firstIndexBelow = index;
        }
        return { visible, position };
      });

    this.itemAnimationData = itemPositions.map((item, index) => {
      return {
        ...item,
        offset: item.position === 'above' ?
          firstIndexBelow - index - 1 :
          index - firstIndexBelow
      };
    });
  });
}
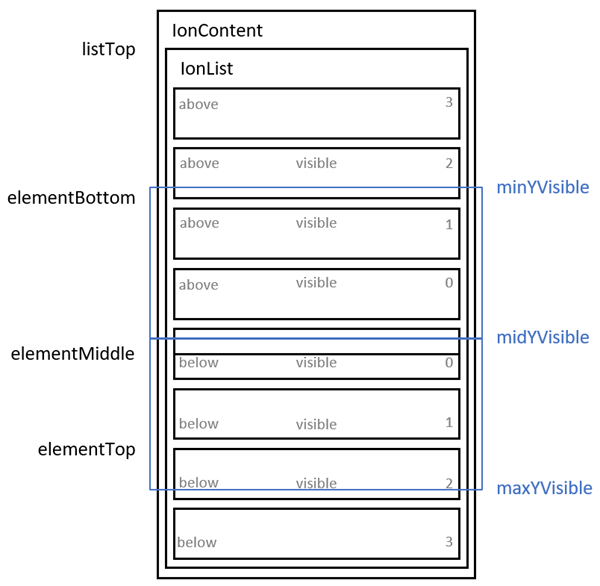
I think the code is best explained with the following diagram, depicting the meaning of each variable and field:
The calculated values in ItemAnimationData are bound to a CSS class and variable in the template:
<ion-list lines="none">
  <ion-item *ngFor="let item of items; index as i"
    (click)="pushDetail()"
    [style.--animation-offset]="itemAnimationData && itemAnimationData[i].offset || 0"
    [ngClass]="{'pop-out': itemAnimationData && itemAnimationData[i].visible}">
    <ion-label>{{item}}</ion-label>
  </ion-item>
</ion-list>
The style binding syntax only work with CSS variables since Angular 9. You can find a working alternative syntax for Angular 8 in my previous blogpost.
The animation takes advantage of the CSS variable and is defined as follows:
.pop-out {
  animation: popOut 0.2s calc(var(--animation-offset) * 70ms) both ease-in;
}

@keyframes popOut {
  0% {
    opacity: 1;
    transform: none;
  }

  100% {
    opacity: 0;
    transform: scale(0.6) translateY(-8px);
  }
}
This is enough for the animation to work as expected but there are few more details to take care of because I'm using it in combination with a page transition.
Most importantly, the pop-out CSS class must be cleared after the page transition. Otherwise, the animation will trigger once again when we navigate back to this page. The best place to do this is in the ionViewDidLeave lifecycle hook:
public ionViewDidLeave() {
  this.itemAnimationData = undefined;
}
Another nice-to-have improvement is to delay the page transition until the animation is complete. To do that, we need the information about the total duration of the animation in the code. To avoid repeating the duration values, they can be defined in the code:
public animationDuration = 200;
public animationDelay = 70;
Then bound in the template:
<ion-list lines="none">
  <ion-item *ngFor="let item of items; index as i"
    (click)="pushDetail()"
    [style.--animation-duration.ms]="animationDuration"
    [style.--animation-delay.ms]="animationDelay"
    [style.--animation-offset]="itemAnimationData && itemAnimationData[i].offset || 0"
    [ngClass]="{'pop-out': itemAnimationData && itemAnimationData[i].visible}">
    <ion-label>{{item}}</ion-label>
  </ion-item>
</ion-list>
And finally used in the CSS:
.pop-out {
  animation: popOut var(--animation-duration) calc(var(--animation-offset) * var(--animation-delay)) both ease-in;
}
The total duration can be calculated from these values and the maximum delay multiplier for a visible list item:
public pushDetail() {
  this.initializeAnimation().then(() => {
    const maxVisibleAnimationOffset = this.itemAnimationData
      .filter(item => item.visible)
      .map(item => item.offset)
      .reduce((acc, cur) => Math.max(acc, cur));

    setTimeout(() => {
      this.navController.navigateForward('/detail');
    }, maxVisibleAnimationOffset * this.animationDelay + this.animationDuration);
  });
}
By delaying the page navigation for the calculated amount of time, the user will see the full list item animation before the page transition starts.
The full source code for the sample project is available in a Bitbucket repository.
This blog post is a part of a series of posts about animations in Ionic.
