Running NDepend Analysis in TeamCity
NDepend Installation
The new version of NDepend brought many new features; among them also integration with TeamCity build server. This convinced me to give it another closer look; evaluating how taking advantage of this can contribute to increasing code quality in larger development teams.
Although the documentation for integrating NDepend with TeamCity is quite detailed, I strongly recommend watching the video, which is much better at explaining which steps need to be done on the server and which on the agent machine. For those who are like me and prefer reading to watching videos, I've written a quick recap, what needs to be done.
On the machine hosting the TeamCity server:
- Extract
ndepend-teamcity.zipfrom theIntegration\TeamCityfolder inside the NDepend archive downloaded from their site. - Copy this zip file to the TeamCity plugins folder (
C:\ProgramData\JetBrains\TeamCity\pluginsby default) - Restart the TeamCity Server service
- Try creating a new build step. If NDepend appears in the list of available runners, the installation was successful.

On the machine hosting the TeamCity agent:
- Extract the NDepend archive downloaded from their site (e.g. into folder
C:\NDepend) - Copy your
NDependProLicense.xmlfile into that same folder - Create a new system environment variable named
NDEPEND_TEAMCITY_HOMEcontaining the path to theIntegration\TeamCitysubfolder of the extracted archive (e.g.C:\NDepend\Integration\TeamCity) - Restart the TeamCity Build Agent service
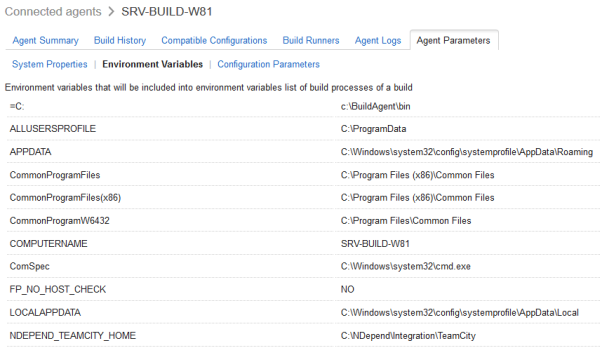
- Check the environment variables for this agent in TeamCity dashboard. If it contains
NDEPEND_TEAMCITY_HOME, the installation was successful.
Before extracting the downloaded NDepend archive, make sure you unblock it in the file Properties dialog:

If you don't, you'll probably encounter the following error when the build agent attempts to run the runner for the first time:
Could not load file or assembly 'NDepend.API, Version=6.1.0.8600, Culture=neutral, PublicKeyToken=02f4313b97e3f583' or one of its dependencies. Operation is not supported. (Exception from HRESULT: 0x80131515) ---System.IO.FileLoadException: Could not load file or assembly 'file:///C:\NDepend\lib\NDepend.API.dll'; or one of its dependencies. Operation is not supported. (Exception from HRESULT: 0x80131515) ---System.NotSupportedException: An attempt was made to load an assembly from a network location which would have caused the assembly to be sandboxed in previous versions of the .NET Framework. This release of the .NET Framework does not enable CAS policy by default, so this load may be dangerous. If this load is not intended to sandbox the assembly, please enable the loadFromRemoteSources switch. See http://go.microsoft.com/fwlink/?LinkId=155569 for more information.
Adding NDepend Project to Your Solution
To run NDepend for your solution on the build server, you will need to create an NDepend project inside it. This will require you to have NDepend Visual Studio extension installed on your development machine. Then you can open your solution in Visual Studio and attach a new NDepend project to it. Start the first analysis and make sure it succeeds without errors. Inspect any warnings as well and make sure none of them affect the correctness of analysis results.
By default, the generated NDepend project file will contain absolute paths to your assemblies. Of course, these won't be the same on your build agent machine, therefore you will need to make them relative. This can be done on the Paths Referenced page of NDepend Project Properties (use NDepend > Project > Set Absolute / Relative Paths Referenced by Project menu item to open it).
Of course you will need to add the NDepend project to source control so that the build server will be able to download it along with the remaining source code. You will need to commit a single file with .ndproj extension. The .sln Visual Studio file will not be modified. This also means developers won't need NDepend unless they will want to run the analysis by themselves. Their Visual Studio without the NDepend extension will not be aware of the .ndproj file at all.
TeamCity Build Configuration
To run the NDepend analysis as a part of your continuous integration, you will need to add another build step to your existing build configuration. Basic setup couldn't be simpler:
- Add a new step as the final one in your existing configuration
- Select NDepend as the Runner type
- Set your
.ndprojfilename as the value for NDepend project file - Save the changes and run the build
The build report will now include two additional tabs containing the analysis results: NDepend and Code Inspection. You can check this video for more information on the data they contain. Unfortunately the report on the NDepend tab, generated with current version of NDepend (v6.1.0.8600), doesn't work correctly with the latest version of Firefox (41.0.1): no images are displayed because of backslashes in their URLs. When viewing the report in Chrome or Internet Explorer (or even Edge), images are displayed correctly. Hopefully this will get fixed in a future version.
If your code contains any critical rule violations, the NDepend runner will cause the build to fail with the following error:
[21:47:33][Step 5/5] Exception Type {NDepend.Analysis.AnalysisException}
Exception Message {3 critical rule(s) violated.}
[21:47:33][Step 5/5] Process exited with code 1
[21:47:36][Step 5/5] Step NDepend (NDepend) failed
Since you can't configure NDepend runner not to fail in this case, you have two options to make the build pass without fixing the violations:
- You can disable one of the Common Failure Conditions on the Failure Conditions page of the build configuration in TeamCity: the build process exit code is not zero. This will affect all build steps and might also cause other build steps to succeed when they should fail.
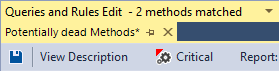
- You can make the offending critical rules non-critical until you fix all the violations. This needs to be done in Visual Studio by selecting the offending rule in the Queries and Rules Explorer window to open it in Queries and Rules Edit window. Now you can disable the Critical switch in the window toolbar and save the changes for each individual rule. Don't forget to commit the changed
.ndprojfile to source control afterwards.
Once your configuration builds successfully with NDepend build step enabled, you can make the analysis result more meaningful. A couple of ideas for next steps:
- Create Additional Failure Conditions for the new NDepend metrics (number of rules violated) or the built-in inspection metrics (NDepend reports rule violations as inspection warnings and errors). You can cause the build to fail when the number raises above a fixed threshold or when it increases in comparison to the previous build.
- Create charts on the Statistics tab of the build configuration for the new NDepend statistic values or built-in inspection statistics.
- In the advanced options of NDepend runner you can select one of the previous builds (latest or a specific one) as the baseline for comparison. This way the report will also include code diff analysis.
If you are serious about improving code quality, NDepend in TeamCity can be a useful tool to track your progress towards it. Nevertheless, it's not a magic bullet. You will still need to improve the code yourself. And you'll very probably also need to do some additional tweaking before the rules will really suite you.
