Installing 32-bit Xerox printer in Linux
With Windows 10 support officially ending, I decided to install Linux Mint on one of my older machines which isn't supported by Windows 11. The transition was really smooth for the most part with the exception of getting my Xerox Phaser 6000 printer to work.
Linux Mint comes with a large collection of printer drivers, so most printers should be recognized automatically and just work. That was not the case for my printer. The add printer dialog suggested to use the driver for Xerox Phaser 6100 instead, but unfortunately my printer didn't like that and its error code suggested that I was using an incompatible printer driver.
On the bright side, Xerox offers a downloadable driver for Debian-based Linux distributions like Linux Mint. However, it's a 32-bit driver and when I tried to install the DEB package, it failed due to missing dependencies. I tried to fix broken dependencies with apt-get as suggested in a Linux Mint forum post and it worked:
sudo apt-get update
sudo apt-get install -f
I tried to add the printer through the dialog again, and it was correctly recognized now. But as soon as I tried to print a test page, it failed again. This time even before the print job was sent to the printer. But that meant that an error might be logged in /var/log/cups. And indeed it was:
D [12/Oct/2025:11:06:29 +0200] [Job 10] Xerox-Phaser-6000B: error while loading shared libraries: libcupsimage.so.2: cannot open shared object file: No such file or directory
I followed the advice from Ask Ubuntu and installed the missing 32-bit library:
sudo apt-get install libcupsimage2:i386
That was enough to get my printer working. The test page printed successfully. And printing from apps worked as well.
Now it was time to share the printer so that I could use it from my Windows 11 machine. I spent several hours tinkering with Samba without success: I could get the file sharing to work, but not printing.
In the end, I got it working without Samba, using only CUPS and IPP. I had to make the following changes in the CUPS configuration file, /etc/cups/cupsd.conf:
- To make CUPS accessible from the local network, I changed the line containing
Listen localhost:631toListen 0.0.0.0:631. - To allow access to the printers from the local network, I searched for the
<Location />block and addedAllow allat the end to make it look like this:<Location /> Order allow,deny Allow all </Location> - To make the printer discoverable over the network, I changed
Browsing OfftoBrowsing On.
I restarted CUPS to apply the configuration changes:
sudo systemctl restart cups
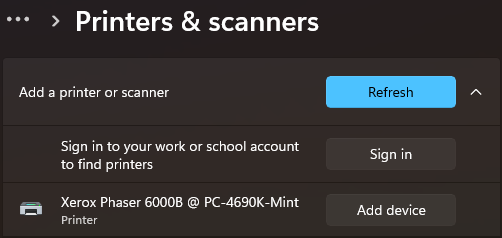
With these changes in place, it was time to connect to the printer from my Windows 11 machine. I opened Settings and navigated to Bluetooth & Devices, and to Printers & scanners from there. When I clicked on Add device next to Add a printer or scanner, the printer showed up:

I clicked Add device and waited for a long time with the Connecting status shown. Then it was Installing... for a couple of seconds, and finally Ready. The printer was added to my list of installed printers. I could successfully print the test page and use it from applications.
The process of getting my printer working wasn't as straightforward as I expected, but in the end I got it to work. It would likely take me much less time if I had more Linux experience. But even without it, i succeeded thanks to many resources online. And learned a few things in the process. Still better than replacing my old computer, printer, or both.
