Connecting to Local IIS Express Server from WP8 Emulator
If you're developing a Windows Phone 8 application which doesn't only connect to public web services to get its data, but also communicates with you own custom web service, you'll want to be able to connect to it from the Windows Phone Emulator with as little hassle as possible. Usually that means that you'll want it to connect to your local IIS Express server to avoid deploying the web service to the full IIS server on your local machine, or even worse: on a different machine.
While setting this up on my development machine two existing web pages proved very helpful, but to get everything working as I wanted it to, I had to combine information from both of them, and even configure some stuff on my own. In this blog post I'll describe the process I used; as a reference for future use. Hopefully someone else will find it helpful as well.
The key to setting everything up, is putting the right web service host IP in your Windows Phone application. Since the application is actually running on a different virtual machine in Hyper-V, you can't just use localhost – you'll need to use the IP of your development machine. By default the emulator is connected to all of Hyper-V's virtual switches, so your WP8 application can connect to the web service through any one of them, but I suggest you use the internal switch, because the corresponding IP of your development machine is always the same, even if it's not on the network, which might happen to your notebook if you're developing while traveling.
To figure out the IP to use, open a command prompt and type
ipconfig
The command will return information on multiple adapters; you're interested in the one matching the name of Hyper-V's internal switch. In my case this was the correct output:
Ethernet adapter vEthernet
(Internal Ethernet Port Windows Phone Emulator Internal Switch):

   Connection-specific DNS Suffix  . :
   Link-local IPv6 Address . . . . . : fe80::c0fc:ebf2:755d:4a03%14
   IPv4 Address. . . . . . . . . . . : 169.254.80.80
   Subnet Mask . . . . . . . . . . . : 255.255.0.0
   Default Gateway . . . . . . . . . :
It seems, 169.254.80.80 is the IP I'm going to use. Now check for the port on which your web service is running. You can find it in Properties of its Visual Studio project, on the Web tab:
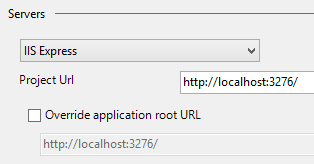
According to the information I gathered, I can now configure the host part of any web service URL's in my WP application to 169.254.80.80:3276. The next step is to bind the web service in IIS Express to this address. This can be done by editing the applicationhost.config file in IISExpress\config subfolder inside your personal Documents folder. Open the file and search for the name of your web service project inside it. You should find a corresponding site element:
<site name="WebServiceProjectName" id="3">
  <application path="/" applicationPool="Clr4IntegratedAppPool">
    <virtualDirectory path="/" physicalPath="Path\To\WebService\Folder" />
  </application>
  <bindings>
    <binding protocol="http" bindingInformation="*:3276:localhost" />
  </bindings>
</site>
You need to add the following binding to the bindings element:
<binding protocol="http" bindingInformation="*:3276:169.254.80.80" />
The unfortunate side effect of this change is that you will need to run Visual Studio as administrator for this to work. IIS Express can only listen to localhost without administrative privileges. After applying the change make sure IIS Express is not running and reopen the solution as administrator. I suggest you temporarily disable the firewall, to check that IIS Express is configured correctly. Your WP8 application should now successfully connect to the web service.
Let's re-enable the firewall and add a rule to it for this to work even with enabled firewall. Open Windows Firewall with Advanced Security and select Inbound Rules from the tree view on the left. Select New Rule from the menu on the right. Once the wizard opens, select Port on the first page and click Next. On the second page select TCP and add your port, i.e. 3276 in my case.

On the third page keep Allow the connection selected. On the fourth page select the connection profiles you want the rule to apply to. The best idea would be to uncheck Public, but at least I wasn't able to change the location of the connection corresponding to the internal switch to anything else then public because it is marked as unidentified. I could make all unidentified connections private through group policy but that wouldn't make much difference. You can check it for your machine in Network and Sharing Center window. In the last page of the wizard choose a suitable name for your rule, so you'll be able to recognize it in the future, e.g. IIS Express My Web Service would be a good name.
With firewall enabled test your WP8 application one last time to make sure it still works, and you're done.
