Web Component Component for Hippo CMS
As a part of getting acquainted with Hippo CMS I took on the task of creating a custom Hippo component for including a Stencil web component in a portal page using the CMS editor. I based my work on a similar component I found on GitHub for a Polymer web component.
I started by creating an interface for configuration parameters:
package org.example.components.info;

import org.hippoecm.hst.core.parameters.Parameter;

public interface WebComponentInfo {
    @Parameter(name = "url", required = true, displayName = "URL")
    String getUrl();

    @Parameter(name = "elementName", required = true, displayName = "Element Name")
    String getElementName();
}
In the component class I retrieve the configuration parameter values and pass them on to the request so that I can access them inside the template:
package org.example.components;

import org.example.components.info.WebComponentInfo;
import org.hippoecm.hst.core.component.HstRequest;
import org.hippoecm.hst.core.component.HstResponse;
import org.hippoecm.hst.core.parameters.ParametersInfo;
import org.onehippo.cms7.essentials.components.CommonComponent;

@ParametersInfo(type = WebComponentInfo.class)
public class WebComponent extends CommonComponent {

    @Override
    public void doBeforeRender(final HstRequest request, final HstResponse response) {
        super.doBeforeRender(request, response);
        final WebComponentInfo paramInfo = getComponentParametersInfo(request);
        request.setAttribute(REQUEST_ATTR_PARAM_INFO, paramInfo);
    }
}
These two files are almost identical to their counterparts in the component I was basing my work on. The main difference is in the template as Stencil web components are distributed as a bunch of Javascript scripts, not as an HTML fragment:
<#include "../include/imports.ftl">

<#-- @ftlvariable name="cparam" type="org.example.components.info.WebComponentInfo"-->
<#-- @ftlvariable name="editMode" type="java.lang.Boolean"-->

<#if editMode>
    <#if cparam.url?? && cparam.elementName??>
        <h2>${cparam.elementName}</h2>
    <#else>
        <i>Click to Select Desired Web Component</i>
    </#if>
<#else>
    <#if cparam.url?? && cparam.elementName??>
        <div>
            <script>
                document.currentScript.parentElement.innerHTML =
                    '<${cparam.elementName}></${cparam.elementName}>';
            </script>
        </div>
    <#else>
        <div>
            <h1>Invalid Web Component Configuration</h1>
        </div>
    </#if>

    <@hst.headContribution category="htmlHead">
        <script type="text/javascript" src="<@hst.webfile path="${cparam.url}"/>">
        </script>
    </@hst.headContribution>
</#if>
To include the script tag in the page head, I take advantage of head contributions. I then dynamically add the element to the DOM in the embedded script. The @ftlvariable directives at the top are there as a hint to code completion in IntelliJ IDEA.
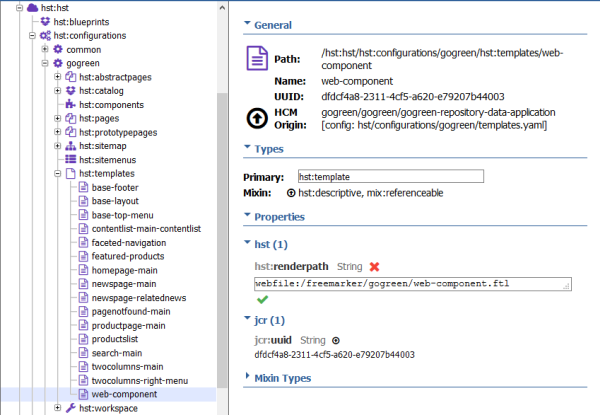
I registered the component in Hippo CMS manually using the Console. First I added the template by:
- adding
web-componentnode of typehst:templatetohst:hst/hst:configurations/gogreen/hst:templates, and - adding and
hst:renderpathproperty with a value ofwebfile:/freemarker/gogreen/web-component.ftlto the newly created node.
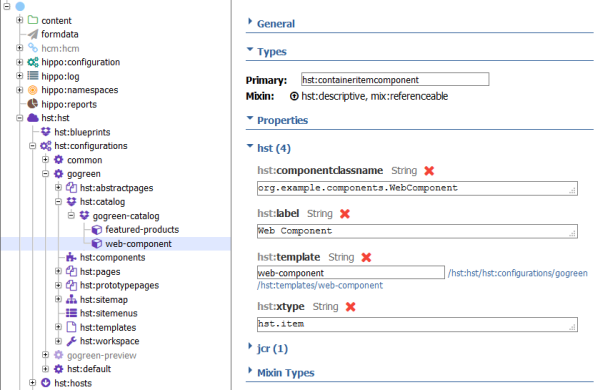
Then I added the component to the catalog by:
- adding
web-componentnode of typehst:containeritemcomponenttohst:hst/hst:configurations/gogreen/hst:catalog/gogreen-catalog, and adding the following properties to it:
hst:componentclassnamewith valueorg.example.components.WebComponent,hst:labelwith valueWeb Component,hst:templatewith valueweb-component, andhst:xtypewith valuehst:item.
After writing the changes to the repository, the component became available in the component catalog of the CMS editor. When dragged into a placeholder on a page, a UI is automatically generated to enter the parameter values:
- Set
Element Nameto the name of the element as specified in the Stencil component, e.g.my-component. - Set
URLto the absolute path to the entry file in the component distribution folder. I put the package intorepository-data/webfiles/src/main/resources/site/webcomponentsfolder, hence the value was/webcomponents/mycomponent/mycomponent.js. (Don't forget to addwebcomponentstohst-whitelist.txtfile if you do the same or the files won't be publicly available.)
Once you publish the changes, the web component should render on the portal.
