Backing up Linux home server using restic
Since I bought an ASUS NUC some months ago to act as my home lab server, I started to rely on a couple of applications running on it. That meant it was time to set up a proper backup as a safeguard in case of a disaster. I chose restic as the backup tool.
I wanted to have the repository on my Synology NAS, so that I could include it in its backup along with the other data. For this purpose, I created a shared folder in Synology and made it available via NFS:
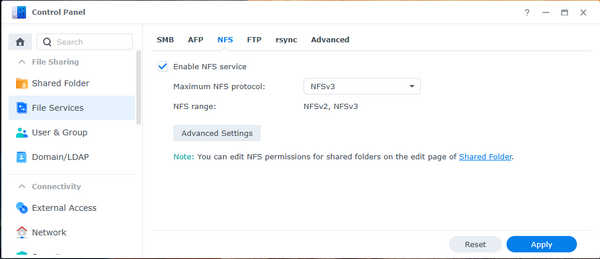
- First, I had to globally enable NFS in Control Panel. I navigated to the File Services page and its NFS tab. There, I checked Enable NFS service and clicked Apply to save the changes.
- This allowed me to configure the NFS permissions for my shared solder of choice. On the Shared Folder page of the Control Panel, I selected it and clicked Edit. I navigated to the NFS Permissions of the dialog that opened and clicked Create. I set the Hostname or IP to my whole home network segment,
192.168.1.0/255.255.255.0and clicked Save twice to save the changes.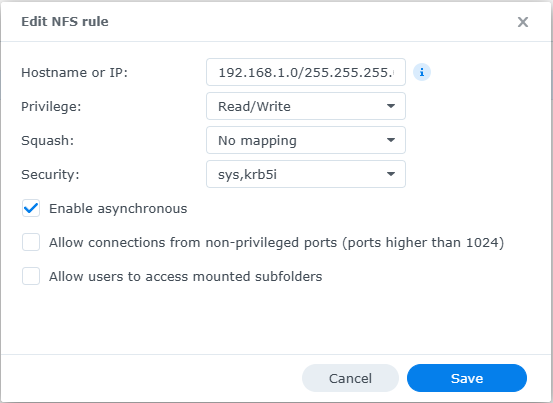
I was now ready to mount the shared folder in my Linux home lab server:
- I had to install the NFS client first:
sudo apt-get update sudo apt-get install nfs-common - I then created a folder for the mount point:
sudo mkdir /mnt/restic - And finally mounted the Synology shared folder:
sudo mount -t nfs 192.168.1.99:/volume1/restic /mnt/restic
To persist the mount across server restarts, I added an entry to /etc/fstab:
192.168.1.99:/volume1/restic /mnt/restic nfs _netdev,rw 0 0
It was time to install restic on my home lab server:
sudo apt update
sudo apt install restic
And then initialize a new restic repository and interactively set a password for it:
restic -r /mnt/restic init
With all this setup, I could finally focus on the backup script. I based the configuration on a blog post I found.
I decided to put all of my restic files in /root/.restic:
- the
backup.shbackup script, - the
includes.txtfile with the folders to back up, and - the
backup.logfile for the backup logs.
In the backup script, I configured the repository folder and password using the environment variables:
export RESTIC_REPOSITORY='/mnt/restic'
export RESTIC_PASSWORD='MY_PASSWORD'
I put the folder for my restic files in a variable to reference elsewhere in the script:
RESTIC_CONF='/root/.restic'
The following function helps me emit log messages throughout the script:
function writelog() {
  echo === $(date -Iseconds) $@ >>$RESTIC_CONF/backup.log
}
Every day, I back up the folders listed in the includes.txt file (one per line):
writelog starting backup process
restic backup --tag auto --files-from $RESTIC_CONF/includes.txt >>$RESTIC_CONF/backup.log 2>&1
writelog backup process complete
I also delete old snapshots daily, except for those I want to keep according to my policy:
writelog starting forget process
restic forget --tag auto --keep-daily 7 --keep-weekly 8 --keep-monthly 12 --keep-yearly 1 --group-by host >> $RESTIC_CONF/backup.log 2>&1
writelog forget process complete
Every Sunday, I prune the files from the repository which are no longer referenced by any of the snapshots not yet deleted. This is a longer process which locks the repository, so I don't do it daily:
if [[ $(date +%w) == "00" ]];  then
  writelog starting prune process
  restic prune >> $RESTIC_CONF/backup.log 2>&1
  writelog prune process complete
else
  writelog no prune process today
fi
That's it for the script. To protect the password inside it, I set the permissions on the file accordingly (available only to root, executable):
sudo chmod 0700 /root/.restic/backup.sh
I scheduled the script to run every night before my Synology backup starts with the following entry in the root's crontab file:
5 0 * * * /root/.restic/backup.sh
As always, you shouldn't trust your backup before you successfully restore some data from it. With restic, the process is rather simple (make sure you have the RESTIC_REPOSITORY and RESTIC_PASSWORD environment variables set before running the commands):
- the
snapshotcommand lists the available snapshots:sudo -E restic snapshots - the
lscommand lists the files in the selected snapshot:sudo -E restic ls 39da736e - the
restorecommand restores the snapshot or a part of it to the target folder:sudo -E restic restore 39da736e:/home/damir/docker/volumes/public/traefik --target ./tmp/restore
Setting up restic was easier than I expected. Fortunately, I didn't have to use the backup since I've set it up. I did check the logs and the repository a couple of times just to be on the safe side. The process has been running flawlessly so far.
