Adding a second NIC to Proxmox VM
As I'm adding more services to my home lab server, I reached a point at which I want to expose some of them to the internet but keep others available only in the internal network. To securely do so from a single virtual machine, I want to serve the two groups of services via a different interface controller. But my virtual machine only had one. How difficult could it be to add a second one?
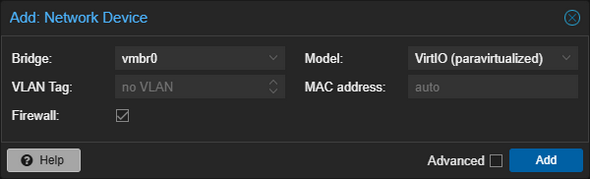
As the first step, I had to add a new network device to the virtual machine. I'm hosting it inside Proxmox VE which made this fairly easy:
- Select the right virtual machine in the Server View tree view.
- Open its Hardware page.
- Select Network Device from the Add dropdown button.
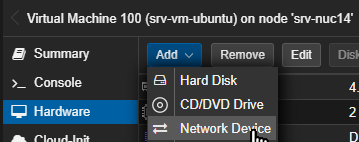
- Keep the default values in the dialog unchanged and click Add
This was enough for the network interface to show up in my Ubuntu virtual machine, as I listed them using:
ip addr show
By comparing the output with the one from before I added the new network device, I could identify a new interface named ens##:
3: ens19: <BROADCAST,MULTICAST> mtu 1500 qdisc noop state DOWN mode DEFAULT group default qlen 1000
    link/ether bc:24:11:2c:da:0f brd ff:ff:ff:ff:ff:ff
    altname enp0s19
Since its state was DOWN, I had to enable it first:
sudo ip link set ens19 up
This changed its state to UP:
3: ens19: <BROADCAST,MULTICAST,UP,LOWER_UP> mtu 1500 qdisc fq_codel state UP group default qlen 1000
    link/ether bc:24:11:2c:da:0f brd ff:ff:ff:ff:ff:ff
    altname enp0s19
    inet6 fe80::be24:11ff:fe2c:da0f/64 scope link
       valid_lft forever preferred_lft forever
But it still didn't have an IPv4 (inet) address when compared to the other network interface:
3: ens19: <BROADCAST,MULTICAST,UP,LOWER_UP> mtu 1500 qdisc fq_codel state UP group default qlen 1000
    link/ether bc:24:11:2c:da:0f brd ff:ff:ff:ff:ff:ff
    altname enp0s19
    inet 192.168.1.98/24 metric 100 brd 192.168.1.255 scope global dynamic ens19
       valid_lft 86352sec preferred_lft 86352sec
    inet6 fe80::be24:11ff:fe2c:da0f/64 scope link
       valid_lft forever preferred_lft forever
To ensure that its IP address will be predictable, I added a new IP reservation to my DHCP server before continuing. The MAC address of the network interface is listed after link/ether, i.e., bc:24:11:2c:da:0f in my case.
My Ubuntu server uses Netplan for network configuration. Its configuration file is located in /etc/netplan. I had to modify the only file there, named 50-cloud-init.yaml, and enable DHCP for the new network interface with an identical entry as it was already there for the old network interface:
network:
  ethernets:
    ens18:
      dhcp4: true
    ens19:
      dhcp4: true
  version: 2
I saved the the changes and applied them using:
sudo netplan apply
This was enough for the new network interface to acquire an IPv4 address:
3: ens19: <BROADCAST,MULTICAST,UP,LOWER_UP> mtu 1500 qdisc fq_codel state UP group default qlen 1000
    link/ether bc:24:11:2c:da:0f brd ff:ff:ff:ff:ff:ff
    altname enp0s19
    inet 192.168.1.98/24 metric 100 brd 192.168.1.255 scope global dynamic ens19
       valid_lft 86399sec preferred_lft 86399sec
    inet6 fe80::be24:11ff:fe2c:da0f/64 scope link
       valid_lft forever preferred_lft forever
Still, I was a bit worried because of the following comment at the top of the /etc/netplan/50-cloud-init.yaml configuration file:
# This file is generated from information provided by the datasource.  Changes
# to it will not persist across an instance reboot.  To disable cloud-init's
# network configuration capabilities, write a file
# /etc/cloud/cloud.cfg.d/99-disable-network-config.cfg with the following:
# network: {config: disabled}
The contents of the /etc/cloud/cloud-init.disabled file put me somewhat at ease:
Disabled by Ubuntu live installer after first boot.
To re-enable cloud-init on this image run:
  sudo cloud-init clean --machine-id
To be certain, I decided to reboot the virtual machine and check that the network interface remains properly configured afterwards. It did.
With all this in place, I could now modify my docker-compose.yml file to only publish the selected ports on one IP instead of all of them, using the extended ports syntax:
ports:
  - "192.168.1.98:80:80"
  - "192.168.1.98:443:443"
This allowed me to publish the same ports from two different containers, for each one on a different IP. Only the container with the ports published on the IP with port forwarding set up on my router can be accessed externally. The other one is only accessible in the internal network.
